Introduction
Slack is used in a lot of workplaces, especially those in the tech industry, for collaboration between team members. In any sort of fast-paced environment, with lots of things going on at once, it helps to be kept notified when something happens. In this guide, we'll discuss the various options available to automate Slack messaging, then go through a few simple steps to create a bot ("app") for your Slack workspace using Slack's Node.js SDK and only a few lines of JavaScript.
Assumptions
- Ownership or admin permissions in a Slack workspace
- Familiarity with Javascript
- Familiarity with npm and simple terminal commands
Table of Contents
Slack messaging options
There are several options available which allow you to send messages to a Slack workspace, and the method you chose may depend on a number of factors, whether they be due to more complex requirements, or financial or technical limitations. We'll discuss each one in turn, and go over a few of the benefits and limitations of each method to help you decide which option works best for you.
In the example implementation shown later in the article, we'll only be using a function which posts plain text to a channel. This can be done with all of the options described below, however there are numerous other features available which can only be performed through use of the API/SDK.
Send an email to a channel
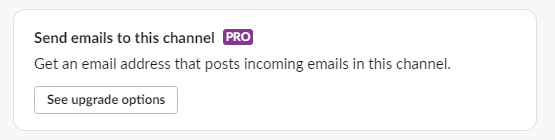
One of the simplest ways to start sending an external message to Slack is by email. Click the channel name, select the "Integrations" tab, then click . If you don't see this option, then you're now aware of the first limitation of this method, as it requires a paid subscription.
If you have a subscription, Slack generates an email address which you can simply send messages to using your email client, or within application code using SMTP - an example is the SmtpClient in .NET. This method allows a small amount of customisation in regards to the name and avatar of the "user" who posts the messages into Slack, and can be quite useful for simple contact form integrations or other lead-generation notifications, but unfortunately no other customisation is available, and any messages sent to this address will appear verbatim in the channel.
Incoming webhooks
Webhooks used to be integrated via an external Slack app also called "Incoming Webhooks", but this has been deprecated in favour of a custom app, with which you can implement webhooks (also referred to as "Incoming Webhooks" confusingly enough), among other functionality.
This method generates a URL which, in a similar manner to the email address option above, you can post to, and the message is sent to the selected channel. The difference here is that the message is sent as a JSON object using a HTTP POST request.
This method offers a greater degree of customisation, and once the app is set up, it's very simple to add new webhooks when required. Due to the level of customisation available, and the additional features and permissions granted by an app using webhooks, the webhook itself should be kept secure and treated like any other set of credentials.
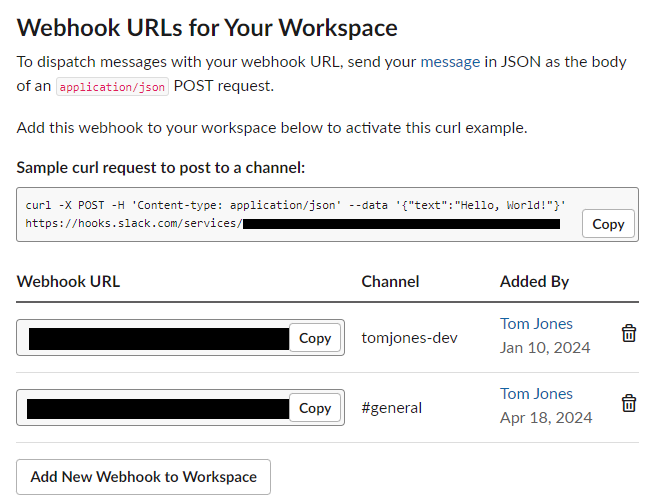
This method of sending messages has a couple of limitations, namely that the webhook only applies to a single channel, and you can only send text-based messages. The former limitation simply means that if you wish to notify multiple channels at once, you will need to set up multiple webhooks, and the latter prevents you using one of the many other functions available to users of the API, such as responding to events, or attaching files.
API/SDK
Slack provides a host of API functions which can be implemented by custom apps - anything from administering users and sending messages, to automatically responding to channel or workspace events. A description of all the API methods available be found in the Slack API documentation.
Similar to webhooks, communication with the API is with a JSON encoded POST request. There are no real limitations with this method as it offers the full host of features available to Slack workspace users. The only real limitation here is complexity, as it would require you to write code which implements HTTP requests to REST endpoints, and since the URLs themselves don't simultaneously act as credentials like the webhooks do, you need to be able to include the Content-Type and Authorization headers in each request. Implementations can be as simple or complex as required, but if you only need to send plain-text messages to a channel, a webhook would be simpler to implement and maintain.
There are a few language-specific SDKs provided by Slack, such as those for Node and Python, which offer a more developer-friendly experience by providing a set of built-in classes and methods, which can be used alongside the usual benefits an IDE provides such as intellisense.

Third party integrations
There are numerous third party services which include Slack implementations as part of their standard functionality, and typically make indirect use of webhooks or the API behind the scenes. For example:
- Pulsetic provides monitoring for website uptime, and can be configured to notify Slack via a webhook if a service goes offline
- Azure DevOps allows users to create "service hooks" which can be linked to a pipeline to send notifications when a build fails or a deployment completes
- Github Actions can be created to make use of the slack-notify or slackapi actions for workflow notifications.
The customisations available for this sort of messaging can vary by vendor who will impose their own limitations. For example, Pulsetic and Azure DevOps only allow you to set a webhook value, and don't include options to define the content of the message, whereas the two Github Actions allow you to define the message payload, which could include things like markdown, images and colours.
Create a Slack app
The remainder of this article will describe how to create an app and start sending messages to your workspace using the NodeJS SDK.
The first step is to create an app, so make sure you have administrative or owner access to a workspace and navigate to the Slack API portal. Hit , select the "From scratch" option, give your bot a descriptive (or fun) name - this can be changed later if needed - select the workspace this app is for, then hit .
Set app permissions
Similar to how a regular user needs permission to join and interact with a workspace, your app needs permission to interact with your workspace by granting a collection of "scopes".
On the Settings page for your new app, navigate to OAuth & Permissions Bot Token Scopes, click , and select chat:write.
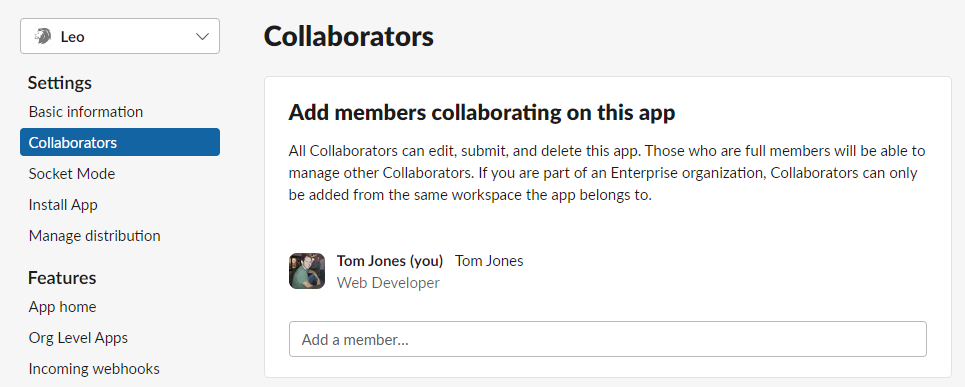
If you work as part of a larger team, either as an employee or as a contractor, you should ensure that other members of your team can manage the app in your absence, whether this be due to holiday, illness, or simply if you move on to another employer. If you don't, the app will be removed from any channels, and your team members won't be able to re-install or edit the app once your account is removed from the workspace.
It's good practise to ensure at least some of your team members are added as "collaborators". This can be done by heading to your app, then selecting "Collaborators" under the Settings side menu option. Workspace members will autofill when you start typing their names.
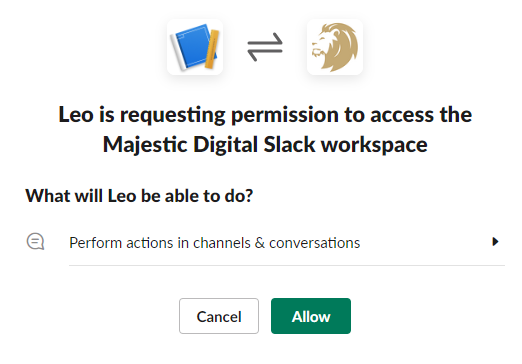
Add the app to your workspace
At the top of page, hit , then click when prompted.
Once you're returned to the OAuth & Permissions page, make a copy of the "Bot User OAuth Token", which starts with "xoxb". You'll need this to allow your Node application to interact with the app.
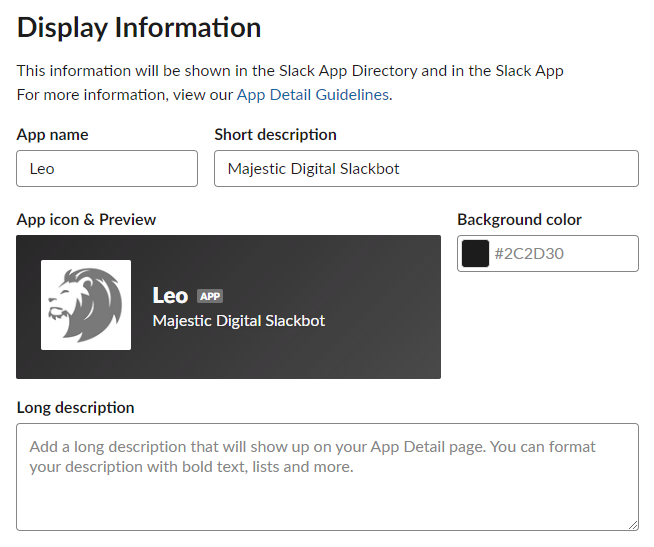
You can customise the appearance of your app, such as giving it a profile picture and providing a description, by navigating to Basic Information Display Information.
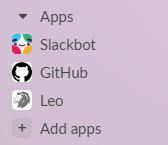
If you check Slack now, you'll notice your new app been added to the list of apps in the sidebar.
To invite the app to a channel, select the channel you want and enter the following command:
/invite @[BotName]

# e.g. /invite @Leo
Use the Slack SDK to interact with the app
Open up your IDE of choice and create a new directory for your application code
mkdir slackbot-leoInitialise NPM to generate a package.json
npm initFeel free to add the applicable details when prompted, but just skip them all with defaults if it's not important right now. We'll be importing a couple of dependencies, so if you prefer to use modules, add "type": "module" to the package configuration.
Create a new file in the root called index.js. To test it's set up correctly just add a
console.log('test')and run the following command in your terminal to ensure you see the expected output (remove the test line afterwards)
node index.jsInstall the Slack SDK package
npm install @slack/web-apiNext add the following block of code to your file
import { WebClient } from '@slack/web-api'

const client = new WebClient('paste_your_token_here')

async function post(message) {
    try {
        await client.chat.postMessage({
            channel: '#general', // Change to your channel name if different
            text: message
        })
    } catch (error) {
        console.log(error)
    }
}

post('Test message')
In this block, you're creating an instance of the Slack web API client, and firing off a request for the app to post a message to the #general channel with the provided text.
Run node index.js in your terminal again and check Slack for the message from your app.

If you'd like to include a bit more customisation in your messaging, such as markdown, images, links or interactive buttons, the API can accept an array of blocks in the body your request. Some of these sections can be quite cumbersome to define in code, but they greatly improve the appearance and clarity of messaging. Slack provides a tool called the Block Kit Builder to help build and visualise the output.
Store your token in an environment variable
It's bad practise to store tokens and other credentials as plain text in your application code, so let's move it out and store it as an environment variable.
Open up your terminal and install the dotenv package using
npm i dotenv --saveCreate a ".env" file in the root of your project folder, and add a variable for your token - the name doesn't matter, but it helps to be descriptive
SLACKBOT_TOKEN="paste_your_token_here"Then import and configure dotenv at the top of your index.js file
import { config } from 'dotenv'
config()
and replace your WebClient instantiation with
const client = new WebClient(process.env.SLACKBOT_TOKEN)Run the node index.js command again to check it all still works as expected.