AWS Costs
This tutorial makes use of several AWS services, some of which do not have free trials, and aren't part of the AWS Free Tier.
Introduction
Some AWS resources are only ever accessed from resources within the same Virtual Private Cloud (VPC). These resources have no public IP address, which grants additional security as they aren't exposed to the public-facing internet. An issue you may come across however, is that these resources are unable to access "global" services directly. In this article, we'll use the AWS Toolkit for Visual Studio to set up an API Gateway endpoint which triggers a Lambda function. The function will communicate outside of its VPC using a VPC Endpoint in order to retrieve a connection string from Secrets Manager, then perform a query against a database hosted on an EC2 instance in the same VPC, before returning the results.
Assumptions
- An AWS account with administrator privileges
- You develop using Visual Studio, and you have AWS credentials configured
- An EC2 instance in a VPC running a database
- Moderate familiarity with .NET and C#
- Familiarity with API Gateway, Lambda and Secrets Manager is beneficial, but not required
Steps
In the following scenario, we have a website hosted on an EC2 instance which needs to be able to retrieve information from the database via an API Gateway endpoint. The endpoint will trigger a serverless Lambda function in the same VPC, which needs to be able to obtain database credentials from Secrets Manager, a "global" resource outside of the VPC, before performing queries against the database.
Create a serverless project
Download and install the AWS Toolkit
The AWS Toolkit provides, among other things, a set of project templates to help create common stes of resources and publish them to AWS from the comfort of your IDE using a built-in CloudFormation process.
Start off by downloading the AWS Toolkit for Visual Studio, and ensuring you have your have AWS credentials configured properly to allow you to connect and modify resources. You can find details on how to set this up in the AWS documentation.
Once installed and configured, create a new project using the AWS Serverless Application (.NET Core - C#) template, and selecting the ASP.NET Core Web API blueprint.
Write the Lambda function code
The Lambda function we'll be writing will query a database hosted on an EC2 instance. For the sake of simplicity, I'll just include raw SQL in the code to perform a basic SELECT query. For this purpose, you'll need to also add the Microsoft.Data.SqlClient NuGet package.
Open up the ValuesController class (you can rename this if you want) and replace the Get endpoint with your database query code. The following example returns a single product matching a pre-defined ID, I've also defined a simple Product class which the result to be deserialised into:
[HttpGet]
public async Task<Product?> Get()
{
    using var connection = new SqlConnection("your connection string");
    await connection.OpenAsync();

    using var command = connection.CreateCommand();
    command.CommandType = CommandType.Text;
    command.CommandText = "SELECT * FROM [Products] WHERE [Id] = 1";
    command.Connection = connection;

    var result = await command.ExecuteScalarAsync() as Product;

    return result;
}

public class Product
{
    public Guid Id { get; set; }

    public string Name { get; set; } = string.Empty;

    public double Price { get; set; }
}
The other auto-generated endpoints aren't required and can just be removed.
Test the API endpoint locally
You can test the function like you would any other web API by calling the endpoint with a simple PowerShell command, or by using more feature-rich API testing tool such as Postman.
Invoke-RestMethod -Uri "https://localhost:57767/api/values"Create a secret for the connection string
Our Lambda function code is currently using a hardcoded connection string, but when deployed it will be referencing a secret managed by Secrets Manager.
Head to the AWS console, navigate to Secrets Manager, click and store your credentials with the following values, providing a suitable name and optional description on the next screen. I'm using SQL Server, which has a default port of 1433. If you're using a different provider, ensure the values are amended accordingly.
| Secret type | Credentials for other database |
|---|---|
| Credentials | Username: <your database username> Password: <your database password> |
| Encryption key | aws/secretsmanager (default) |
| Database | SQL Server |
| Server address | <Your server's private IP address> |
| Database name | MyAppDatabase |
| Port | 1433 |
Retrieve the secret in the Lambda code
Return to your code and add the AWSSDK.SecretsManager NuGet package to your project.

Creating a secret via the console generates the code you can use with the language of your choice. Below is a modified example using the .NET SDK. I've also defined a Credentials object which the response can be deserialised with for strongly-typed properties, and make use of StringBuilder to construct a connection string out of the individual secret fields. Make sure you change the secretName and region to match the secret you just created.
private static async Task<string> GetSecret()
{
    var secretName = "MyAppDbConnectionString";
    var region = "eu-west-2";

    var client = new AmazonSecretsManagerClient(RegionEndpoint.GetBySystemName(region));

    var request = new GetSecretValueRequest
    {
        SecretId = secretName,
        VersionStage = "AWSCURRENT"
    };

    GetSecretValueResponse response;

    try
    {
        response = await client.GetSecretValueAsync(request);
        var options = new JsonSerializerOptions() { PropertyNameCaseInsensitive = true };

        var credentials = JsonSerializer.Deserialize<Credentials>(response.SecretString, options)
            ?? throw new InternalServiceErrorException("Failed deserialising connection string.");

        var connectionString = new StringBuilder();
        connectionString.Append($"server={credentials.Host};");
        connectionString.Append($"database={credentials.DbName};");
        connectionString.Append($"user id={credentials.Username};");
        connectionString.Append($"password={credentials.Password}");

        return connectionString.ToString();
    }
    catch (Exception e)
    {
        // For a list of the exceptions thrown, see
        // https://docs.aws.amazon.com/secretsmanager/latest/apireference/API_GetSecretValue.html
        throw e;
    }
}

public class Credentials
{
    public string Username { get; set; } = string.Empty;

    public string Password { get; set; } = string.Empty;

    public string Engine { get; set; } = string.Empty;

    public string Host { get; set; } = string.Empty;

    public string Port { get; set; } = string.Empty;

    public string DbName { get; set; } = string.Empty;
}
Now you can replace the hardcoded connection string in your Lambda function's Get method with a call to the new GetSecret method:
using var connection = new SqlConnection(await GetSecret());Test the endpoint again to ensure your secret is retrieved successfully, and that you are still able to query the database.
Build and publish to AWS
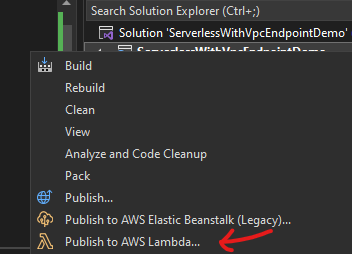
Once you're happy that the code is working locally, right click the project and hit "Publish to AWS Lambda...".
Provide a name for your application stack, and create or select an existing bucket to store the stack data and source code. The deployment will begin, and after a few moments you should be able to see a completion status, along with the API Gateway endpoint you can use to trigger the function.

You can test the base URL endpoint in the same way as you tested the Get method previously to ensure deployment was successful - a GET request to this URL should return a basic string to show it's working.
Invoke-RestMethod -Uri "https://<URL-ID>.execute-api.eu-west-2.amazonaws.com/Prod"

# Output: Welcome to running ASP.NET Core on AWS Lambda
If you append "/api/values" to your URL, you'll notice however that the server responds with a HTTP 500 error. Head back to the AWS console, navigate to the Lambda service, select your new function, go to the Monitor tab and click . Find the error message, and you should see something similar to this:
Amazon.SecretsManager.AmazonSecretsManagerException: User: arn:aws:sts::xxxxxxxxxxxx:assumed-role/ApiGatewayLambdaDemo-AspNetCoreFunctionRole-bFHCJfOLy4sO/ApiGatewayLambdaDemo-AspNetCoreFunction-6FYrz118ps5T is not authorized to perform: secretsmanager:GetSecretValue on resource: MyAppDbConnectionString because no identity-based policy allows the secretsmanager:GetSecretValue actionConfigure IAM, API Gateway and Lambda
Update Lambda role permissions to allow access to the secret
Navigate to the IAM service, select Roles from the side menu, then find the role which was created as part of the Lambda deployment - in my case, it's ApiGatewayLambdaDemo-AspNetCoreFunctionRole-bFHCJfOLy4sO - catchy name I know.
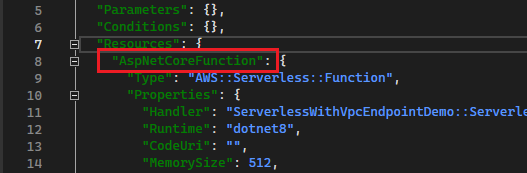
Note: If you want to change the name applied to your function and the associated resources, this can be done by updating the following node in the serverless.template file, which is included in the project template
On the Permissions tab, select Add permissions, then Create inline policy. Select Secrets Manager, expand the "Read" section and select "GetSecretValue". You can narrow the permission down to a specific secret by grabbing your secret's ARN from the "Secret details" screen in Secrets Manager, then press "Add ARN", and paste it into the "Resource ARN" field. Press , give your inline policy a name, then hit .
Add the Lambda function to the VPC
Before adding a Lambda to a VPC, you'll need to update the role with a few more permissions. Head back to IAM and create another inline policy with the following permissions:
{
	"Version": "2012-10-17",
	"Statement": [
		{
			"Sid": "VisualEditor0",
			"Effect": "Allow",
			"Action": [
				"ec2:CreateNetworkInterface",
				"ec2:DescribeNetworkInterfaces",
				"ec2:DeleteNetworkInterface",
				"ec2:CreateTags"
			],
			"Resource": "*"
		}
	]
}
Navigate back to your Lambda function, then on the Configuration tab select the VPC option, then click Edit. Select the VPC your EC2 resides in, then select the applicable subnet(s) and security group(s) and hit Save.
As your Lambda is now part of a VPC, it will no longer be able to communicate with Secrets Manager. If you test the endpoint once more you'll notice a different message appears, progress!
Configure a VPC Endpoint
AWS provides a few methods of communicating outside of a VPC. One is a NAT Gateway, which allows outbound access to the public internet and costs about $1 (USD) a day depending on your region, and another is called a VPC Endpoint, which allows outbound communications to other services in your account, and costs roughly $0.25 a day, and is what we'll be using.
Navigate to the VPC service, select Endpoints from the side navigation, then click . Choose "AWS services" as the Service category, then filter the Services list to find "com.amazonaws.eu-west-2.secretsmanager". Select the result, pick out your instance's VPC from the list, along with the subnet(s) in which it is hosted, and the security group applied to it - ensure "Enable DNS name" is selected from the Additional settings. Leave the Policy as "Full access" then click .
The instance security group will also need to contain an entry which grants access to itself for port 1433 (SQL Server). To update this, navigate to the EC2 service, select the Security groups option from the side menu, select the group attached to your instance, then under "Inbound rules", hit and add a record similar to the one shown below targeting your security group.

Test your endpoint again, and you should be able to see the data being queried from the database.