Introduction
In this guide we will be creating a component which allows editors to add social links onto their Umbraco master page, using the popular icon library Font Awesome. We'll make use of a custom Dropdown, Document Type, Composition and Nested Content, each using a variety of property types.
Assumptions
- Basic familiarity with Umbraco
- Basic familiarity with .NET MVC and Razor syntax
Steps
Create a dropdown list for icons
In the back office, under Data Types, create a new type called "[Picker] Social Icon", selecting "Dropdown" as the property editor. Add a few prevalues named after the icons you'll be using on the frontend. The code on the frontend will use these values in the element classes to display the appropriate icon.
I'll be using the following icons from the Font Awesome library:
- globe
- github
- at
Create an element for social link properties
Create a new Document Type (Element type), called "Social Icon", this will define the properties which make up a single social icon. Add a new group (not tab!) called "Content", with the following properties:
| Name | Type |
|---|---|
| Icon | [Picker] Social Icon |
| URL | Textstring |
| URL Title | Textstring |
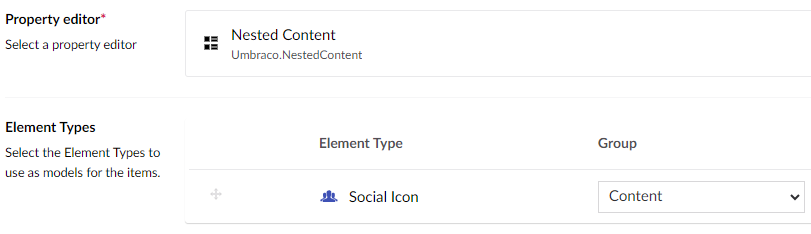
Add nested content for social links
Under Data Types, create a new Data Type called "[Nested] Social Icons", selecting the Property editor of "Nested Content", and select our new Social Icon element as one of the Element Types.
Create a property using the new data type
I want the social icons to be shown in my page footer, and I define header, navigation and footer properties in a "Layout" composition attached to my Home Page document type.
Add a property to your chosen composition or document type, call it "Social Links", and select your new "[Nested] Social Icons" as the editor for this property.
Add social links to your page
Under the Content node, find the page where you've added the Social Icons property, and set a few values.
Add icon library and style rules to your frontend
Import Font Awesome
On your layout/master page, import the Font Awesome library stylesheets into your project using either a local package manager, or via a CDN.
<link href="~/lib/font-awesome/css/brands.min.css" rel="stylesheet" />
<link href="~/lib/font-awesome/css/solid.min.css" rel="stylesheet" />
Add stylesheet rules
I'll use a prefix class .icon to identify icons, followed by another class using the name of the icon from Font Awesome to define the content and font values. The following uses SCSS syntax:
.icon {
    &::before {
        display: inline-block;
        text-rendering: auto;
        -webkit-font-smoothing: antialiased;
    }

    &.globe::before {
        font: var(--fa-font-solid);
        content: '\f57d';
    }

    &.twitter::before {
        font: var(--fa-font-brands);
        content: '\f099';
    }

    &.linkedin::before {
        font: var(--fa-font-brands);
        content: '\f08c';
    }

    &.github::before {
        font: var(--fa-font-brands);
        content: '\f09b';
    }

    &.at::before {
        font: var(--fa-font-solid);
        content: '\40';
    }
}
Add Razor syntax to the view
Using either models builder or hardcoded strings, create a loop to output an icon and link for each item in the SocialLinks property.
@{
    var homePage = Model.AncestorOrSelf<HomePage>();
}

@if (homePage?.SocialLinks is not null && homePage.SocialLinks.Any())
{
    <ul class="social-links">
        @foreach (var link in homePage.SocialLinks)
        {
            <li>
                <a class="icon @link.Icon" href="@link.URL" title="@link.URltitle" target="_blank" rel="noopener noreferrer"></a>
            </li>
        }
    </ul>
}
Then run the project and check the output.