Assumptions
- Familiarity with .NET/C#
- Familiarity with Blazor beneficial but not required
- Basic understanding of web-based communication (e.g. REST)
- Access to a Windows server for deployment (optional)
- Visual Studio 2022+
Table of Contents
Introduction
In this tutorial we will go over some of the key technologies and a few of the main concepts involved in WebSocket communication, and how it can be used in the .NET ecosystem to allow groups of users to vote in real-time.
We will be building a Blazor application which generates an environment where visitors can create their own custom rooms with a unique URL to share with their team. The vote options consist of a number of buttons based on the Fibonacci sequence - a common approach when estimating tasks in agile workflows.
Note: The example used for Building the voting app is designed to illustrate WebSocket communication, and has some flaws due to the lack of any method of persistence (i.e. a database). Furthermore, in the interest of keeping the project structure as simple as possible, there has been no attempt to follow any component/code-splitting best practices.
WebSockets, SignalR, and RPC
A WebSocket is a protocol that enables two-way communication over the web, commonly used for online chatrooms and gaming. It differs from HTTP in that the communication occurs simultaneously, also known as "full-duplex", whereas HTTP is considered "half-duplex" because communication can only happen in one direction at a time (i.e. the request/response flow). A good analogy of the two is a telephone and a walkie-talkie; the telephone represents a WebSocket connection and allows two people to speak at the same time, whereas the walkie-talkie representing a HTTP connection uses a push-to-talk button, which blocks the receiver whilst the other is speaking.
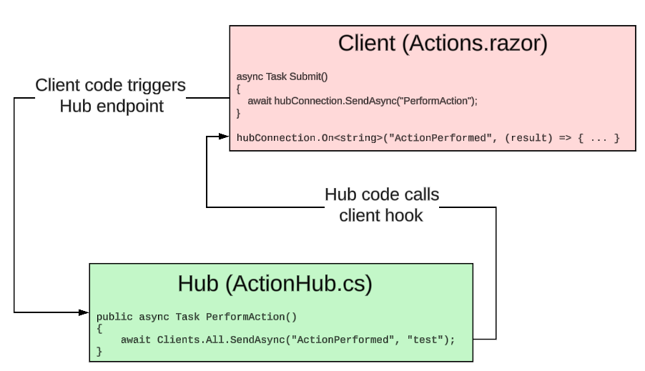
SignalR is an open-source library with APIs which facilitate real-time functionality in web applications using Remote Procedure Calls (RPC) to send messages to connected users. There are two main parts to a SignalR app, the hub in the back-end, and the client in the front-end. RPCs allows clients to call methods (procedures) on the hub, and hubs can call methods on the client. These will be explained in greater detail in the next section.

SignalR makes use of multiple communication methods depending on what's available. For example, if you deploy your app to a server which doesn't support WebSockets, communication will be handled using POST requests, or "long polling", which is a technique used where a client sends a request for updates, but the response isn't return immediately. Instead, the connection is kept active until an update is available, and only then is it returned to the client. SignalR chooses the best option based on the resources available, with fallbacks selected in that order.
Main concepts
| Hubs | A hub acts as the central point on the server for a particular resource, and allows clients to call functions defined in the class. A hub must be registered in the application's main function. Client applications reference the endpoints in their code, and actions performed by users trigger these procedures in real-time. |
|---|---|
| Connections | A connection refers to a single user of the application who is connected to a hub, and can be identified by a unique connection ID. |
| Groups | Connections can optionally be grouped into logical collections, identified by a group name. When a hub calls a function on the client application, the call can be sent to every connection, or scoped to a subset of relevant parties identified by their group. This is useful in applications such as chatrooms as it allows messages to be sent only to certain users, for example if they are members of a particular channel. |
| Views | The component, or page associated with a hub-user connection represents the visual elements that users interact with. |
Building the voting app
A link to the source code for this tutorial can be found in the sidebar (the tutorial branch), and a live example can be found at https://votingroom.tomjones.dev. Please note however that the live demo is a project which is a work in progress based on the main branch of that repository, and may change over time as new features are added.
The end result will look something like this, give or take a few styling differences which aren't important here.

Open up Visual Studio and create a new project using the Blazor Web App template. The SignalR-based project was previously known as "Blazor Server" to differentiate the architecture from Web Assembly ("Blazor WASM"), but the Blazor Server concept was superseded by Blazor Web App after .NET 6.

In a Blazor Web App, the first project shown in the list is where your hubs will reside - confusingly, it also contains directories for UI components, but the pages your hubs will communicate with should live in the second project, which is identified as the "Client".
Set the starting project as the first one, then run to make sure it builds as expected. If you're familiar with Blazor templates, you won't see anything new here in regards to boilerplate - a nicely coloured gradient navigation bar on the left, and the usual links for counter and weather which demonstrate basic Blazor functionality.
Add the models
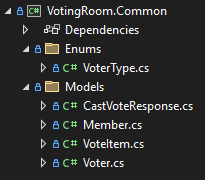
This main project and the client project will share a few classes and an enum - I typically add shared resources to a separate class library labelled "Common". If you intend to follow along, create a new C# class library project, and add the following items:

public enum VoterType
{
    Participant,
    Spectator,
}
public class CastVoteResponse
{
public required int VoterId { get; set; }
public required string VoterName { get; set; }
public required int VoteItemId { get; set; }
}public class Member
{
public int Id { get; set; }
[Required]
public string Name { get; set; } = string.Empty;
}public class VoteItem
{
public int Id { get; set; }
public string Name { get; set; } = string.Empty;
public List<Member> Voters { get; set; } = [];
public int Votes => Voters.Count;
}
public class Voter : Member
{
    public VoterType Type { get; set; }
}
Create a view
We'll begin by laying out the visual elements of our app, to help identify what it will consist of from the user's perspective. Add a razor component into the "Pages" directory, or rename one of the existing ones - make sure the @page directive at the top of the file matches the route to your page, and update the page link in NavMenu.razor accordingly.
<NavLink class="nav-link" href="" Match="NavLinkMatch.All">
    <span class="bi bi-house-door-fill-nav-menu" aria-hidden="true"></span> Rooms
</NavLink>
We will be using a single page, which will consist of three different views depending on the data available to it:
- create a room (with a unique URL)
- join a room (using the URL)
- cast a vote (see other members of the room and cast your vote)
Before we begin, add the Microsoft.AspNetCore.SignalR.Client NuGet package to the client project and ensure the following declarations are included at the top of the page:
@rendermode InteractiveWebAssembly // required by the framework
@using Microsoft.AspNetCore.SignalR.Client // allows communication with the HubConnection class
@using VotingRoom.Common.Enums // project reference
@using VotingRoom.Common.Models // project reference
@inject NavigationManager Navigation // used for redirection and retrieving the current URL
@inject IJSRuntime JSRuntime // used for JS interop
@implements IAsyncDisposable // used to handle disposal of unused hub connections
You'll need to define a disposal method to satisfy the interface:
public async ValueTask DisposeAsync()
{
    if (hubConnection is not null)
    {
        await hubConnection.DisposeAsync();
    }
}
Create a room
We'll determine which view to display with a couple of conditions. The first stage will consist of a single button which triggers a redirection, and will act as the entry point of our app. This section will only be seen by room creators:
@if (RoomId == null)
{
    <button @onclick="RedirectToNewRoom" class="btn btn-success">Create room</button>
}
Update the route directive to include an optional GUID, and add a route parameter and function inside the code block. This function will redirect users to the same page, but with a GUID appended, for example ~/room will become ~/room/f3ebbf8e-a344-4ca3-8995-7ee2e5ff7b1a:
@page "/{RoomId:guid?}"

...

[Parameter] public Guid? RoomId { get; set; }

void RedirectToNewRoom()
{
    Navigation.NavigateTo("/" + Guid.NewGuid());
}
Join a room
The second stage consists of a simple form which allows users to set their name, and their role in the room:
else if (voter.Id == 0)
{
    <EditForm Model="voter" OnValidSubmit="JoinRoom">
        <DataAnnotationsValidator />

        <label>
            Name
            <InputText @bind-Value="voter.Name" />
            <ValidationMessage For="() => voter.Name" />
        </label>

        <InputRadioGroup @bind-Value="voter.Type">
            @foreach (var type in Enum.GetValues<VoterType>())
            {
                <div>
                    <label>
                        <InputRadio Value="type" />
                        Join as a @type
                    </label>
                </div>
            }
        </InputRadioGroup>

        <small>Participants can vote, spectators can't</small>
        <br />
        <button class="btn btn-success">Join</button>
    </EditForm>
}
For this view, we'll be defining a private variable to represent the current voter, and our first function which will be connecting to the hub - add the following within the code block, leaving JoinRoom as an empty stub for the time being, we'll add the logic for this at the same time as the hub code:
Voter voter = new();

async Task JoinRoom()
{
}
Cast a vote
The final part of the UI consists of the actual room which has been created, and renders a description of the room, a number of buttons for voting, a function to copy the URL for sharing, and a list of the room's members:
else
{
    <div class="room-description">
        <div>
            <h2>Story point voting</h2>
            <p>Simple story point voting page, using the Fibonacci sequence as a way to ascertain a task's <strong>complexity</strong>.</p>

            <button @onclick=@(() => JSRuntime.InvokeVoidAsync("navigator.clipboard.writeText", Navigation.Uri)) class="btn btn-primary">Copy room URL to clipboard</button>
        </div>

        <div>
            <h3>Participants</h3>
            <ul>
                @foreach (var voter in voters)
                {
                    <li class="text-nowrap">@voter.Name (@voter.Type)</li>
                }
            </ul>
        </div>
    </div>

    <div class="card-group">
        @foreach (var item in voteItems)
        {
            <div class="card" style="width: 18rem;">
                <div class="card-body">
                    <p>Total votes: @item.Votes</p>
                    <button class="btn btn-lg btn-success w-100" @onclick="() => CastVote(item.Id)" disabled="@(!IsConnected || remainingVotes == 0 || voter.Type == VoterType.Spectator)">@item.Name</button>
                </div>
                <ul class="list-group list-group-flush">
                    @foreach (var voter in item.Voters)
                    {
                        <li class="list-group-item">@voter.Name</li>
                    }
                </ul>
            </div>
        }
    </div>
}
For this view, we'll define a variable to represent the room's members, a hardcoded list of vote options, a function to allow users to cast their vote (just a stub again), an instance of the class we'll use to create hub connections, and a couple of conditions to restrict voting:
List<Voter> voters = [];

List<VoteItem> voteItems =
[
    new() { Id = 1, Name = "1" },
    new() { Id = 2, Name = "2" },
    new() { Id = 3, Name = "3" },
    new() { Id = 4, Name = "5" },
    new() { Id = 5, Name = "8" },
    new() { Id = 6, Name = "13" },
    new() { Id = 7, Name = "21" },
];

async Task CastVote(int voteItemId)
{
}

int remainingVotes = 1;

HubConnection? hubConnection;

public bool IsConnected =>
    hubConnection?.State == HubConnectionState.Connected;
Create a hub
We'll now move onto the functions which our client will be interacting with by adding a backend to our application. In the top project, create a directory called "Hubs", and a class in the new directory called "RoomHub", which should inherit from Hub. Before we begin, in the application's entry point (Main), register the following services to the container, and register a route for the hub, referencing the new class type:
builder.Services.AddSignalR();
builder.Services.AddResponseCompression(opts =>
{
    opts.MimeTypes = ResponseCompressionDefaults.MimeTypes.Concat(
        ["application/octet-stream"]);
});

app.UseResponseCompression();
app.MapHub<RoomHub>("/roomhub");
Add the JoinRoom procedure and client code
The first method we'll add to the new class will allow connected clients to join a room. This method adds a user, identified by their ConnectionId to the given room, a "group" in this context. SendAsync calls the function identified in the first parameter on the client with the provided values:
public async Task JoinRoom(Voter voter, string roomId)
{
    await Groups.AddToGroupAsync(Context.ConnectionId, roomId);
    await Clients.Group(roomId).SendAsync("JoinRoom", voter);
}
Head back to the Room page in the client project, where we can now add an implementation to the JoinRoom method, and see how it all links up with an event handler.
Create on override of Blazor component's OnInitializedAsync method, and build a HubConnection instance:
protected override async Task OnInitializedAsync()
{
    hubConnection = new HubConnectionBuilder()
        .WithUrl(Navigation.ToAbsoluteUri("/roomhub")) // The route defined in Main
        .Build();

    await hubConnection.StartAsync();
}
As we saw in the hub, JoinRoom expects two parameters, the voter and the RoomId, both of which are defined in our code block. Additionally, if you recall from the display condition earlier, the presence of a voter's ID is what decides whether to show the "join room" form, or the voting panel, so this is where we can populate the value to acknowledge that the user has now been assigned to this room:
async Task JoinRoom()
{
    if (hubConnection is not null) {
        voter.Id = voters.Count + 1;
        await hubConnection.SendAsync("JoinRoom", voter, RoomId);
    }
}
The client and hub are now linked to allow communication in one direction, but we still need to complete the circle and allow the hub to respond to the client.
The OnInitializedAsync override defined previously is also where the procedures which will be called by the hub are defined, so add the following, ensuring it appears before StartAsync:
hubConnection.On<Voter>("JoinRoom", (newVoter) =>
{
    voters.Add(newVoter);
    InvokeAsync(StateHasChanged);
});
The On method of a HubConnection defines an event handler (or "hook") for function calls from the assigned hub. In this case, when the client receives a "JoinRoom" event, it indicates that a voter has joined the room and that their name should be added to the list of members - this list of what populates the list of "Participants" on the page.
Add the CastVote procedure and client code
Staying in the client project, populate the CastVote stub with the following:
async Task CastVote(int voteItemId)
{
    if (hubConnection is not null && remainingVotes > 0)
    {
        await hubConnection.SendAsync("Vote", RoomId, voter, voteItemId);
        remainingVotes--;
    }
}
To allow a vote to be cast, we need to provide the hub with the room's ID to ensure the appropriate Group can be notified of changes, the voter's details, and finally the item they voted for. The additional condition, along with the decrement merely prevents a voter from voting more than once.
Back in the hub, add a "Vote" method to notify the client of the user's vote:
public async Task Vote(string roomId, Voter voter, int voteItemId)
{
    await Clients.Group(roomId).SendAsync("Vote", new CastVoteResponse
    {
        VoterId = voter.Id,
        VoterName = voter.Name,
        VoteItemId = voteItemId,
    });
}
The SendAsync in this method will broadcast details of the vote to all connected users who are members of the group, identified by the provided room ID. We now just need to implement the final piece of the puzzle on the client side in the form of a second event handler:
hubConnection.On<CastVoteResponse>("Vote", (vote) =>
{
    var voteItem = voteItems.First(vi => vi.Id == vote.VoteItemId);
    voteItem.Voters.Add(new() { Id = vote.VoterId, Name = vote.VoterName });

    InvokeAsync(StateHasChanged);
});
This event handler updates the UI of each connected user to show them who voted for which item by appending the voter's name under the appropriate vote button.
Deploy to Windows (IIS)
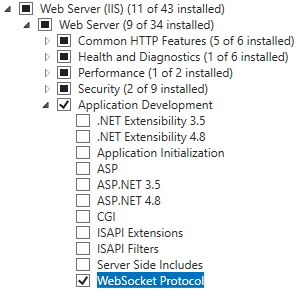
This article isn't intended as a guide to help deploy apps to web servers, but since this article is aimed at developers who are new to WebSockets, it seemed relevant to point out that some additional configuration may be required on a web server, as this protocol is typically disabled by default on Windows. If you don't enable WebSockets manually, you may notice that your browser's Network tab is showing standard POST requests, rather than the expected WebSocket.
To enable this feature, go to "Turn Windows features on or off", and ensure the "WebSocket Protocol" option is selected. You will need to restart your server after this feature has been installed.
