AWS Free Tier
SQL Server Express system requirements exceed the resources available with the t2.micro instance size which is included in the free tier. This guide will be using a t2.small, pricing for which can be found at https://aws.amazon.com/ec2/pricing/on-demand/. If you don't intend to continue hosting the website, ensure the instance is shut down after use.
Introduction
In this guide we'll be creating a .NET website, and deploying it to an AWS EC2 instance running Windows Server. The example I'll be going through will be using an empty Umbraco template, but many of the steps will apply to a variety of .NET-based websites. I've chosen Umbraco because it's something I'm working with at the moment, and the installation process creates a database automatically, which allows me to focus on the main purpose of this guide, which is hosting an application.
Assumptions
- Access to an AWS account
- Familiarity with .NET, AWS, Windows Server and IIS is beneficial, but not required
- Visual Studio 2022
Steps
Create an app and publish it to a local directory
If you're following along the guide to host an Umbraco website, you'll need to install the templates first. Open up a terminal and run the following command:
dotnet new install Umbraco.Templates::10.0.0Restart Visual Studio and you should see the following options for new projects:
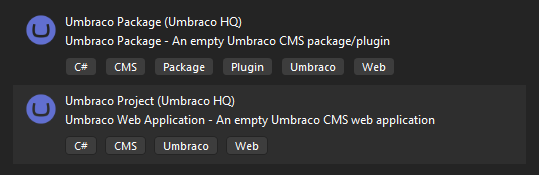
Pick the second option, "Umbraco Project", then on the settings check "Use HTTPS redirect". You can leave the other settings as default for now.
Build the app to ensure everything compiles properly, then right click the project and hit and select "Folder" from the destination options, ensure the settings match what's shown below:
| Property | Value | Description |
|---|---|---|
| Delete existing files | true | Remove potentially unwanted files each time there's a new publish |
| Configuration | Release | |
| Target Framework | net6.0 | |
| Target Runtime | win-x64 | Default behaviour "Portable" includes runtimes for various architectures, since we're using Windows we exclude the others to reduce the size of the publish output |
then hit .
Launch an instance using AWS EC2
Launch a new instance
Log into AWS and navigate to EC2, then Instances. Hit . Select a Windows Server, using whichever version of the "Base" AMI you prefer - if you're not sure, just go for the latest one (currently "Microsoft Windows Server 2022 Base"). You'll notice that the list includes AMIs which include SQL Server, but these cost more as they use a full licenced version of SQL Server. For a lot of development projects and small applications, SQL Server Express is sufficient.
You can select an instance size of t2.micro to keep within the AWS free tier eligibility, however you will find that this will run very slowly once you start installing applications. I recommend a minimum of t2.small - you can always change the size or switch it off afterwards if needed.
Generate a new key pair, then create a new security group and select "Allow RDP traffic from" and specify "My IP". Also check the boxes to allow HTTP and HTTPS traffic from the internet.
Leave the rest of the settings as default and hit .
Return to the list of instances and after a few minutes the new instance should change state to "Running" and the status checks complete.
Connect to the instance
Select the new instance and hit , then select the RDP client tab, press and upload the key pair you selected in the previous step.
Copy over the publish files
Once connected, open up file explorer, navigate to C:/inetpub/wwwroot and create a new folder for your website, then copy the contents of your published application into this folder - this might take a few minutes, especially if you've opted for the free tier compatible "micro" instance.
Install the required software
We first need to install IIS by enabled the Windows feature. From the start menu, find "Turn Windows features on or off", skip through the wizard steps until you reach "Server Roles", expand "Web Server (IIS)" then "Management Tools", and select "IIS Management Console". Proceed to the end to install this feature.
Next, open up a web browser and download and install the following:
- SQL Server Express
- You'll see an option to install SQL Server Management Studio (SSMS) when this is complete, click the button to install this too
- .NET Core 6 Hosting Bundle
- This bundle includes the modules required to run your app through IIS, so make sure IIS is installed first. If you installed IIS after the bundle, you'll need to "repair" the bundle installation.
Configure the database
Open up SSMS and connect using Windows authentication. Right click the Databases node and create a new database, give it a name and press .
Common convention for web applications is to connect to a database using SQL credentials rather than the server administrator, as the database instance may not always be on the same server.
Expand "Security", right click "Logins", select "Create Login...", then set the following values:
| Property | Value | Description |
|---|---|---|
| Login name | demo.app | Choose something which identifies the account as being for your application |
| SQL Server authentication | selected | |
| Password/Confirm password | something secure | Google for "password generator", there are plenty of options |
| Enforce password policy | unchecked | Avoids the need for the "user" to pick a new password |
| Default database | the new database | |
| Server roles | check "dbcreator" | |
| User mapping | check the new database, then underneath select the "db_owner" role |
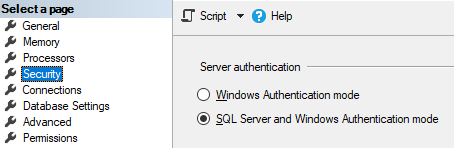
Press to confirm. Finally, right click the server node, go to "Security", and ensure "SQL Server and Windows Authentication mode" is selected.
Configure IIS
Application Pool configuration
Open up IIS, on the left sidebar expand the server and "Sites" folder. Right click and remove the default site, go to "Application Pools", then right click and Rename the current pool to your website's domain and change the .NET CLR version to "No Managed Code".
Open up file explorer and navigate back to C:/inetpub/wwwroot, right click your website's directory and select Properties, then go to the Security tab. Press Edit, then Add, and enter IIS APPPOOL\<your application pool name> and hit "Check Names" then press "OK". Select the user from the list and ensure "Modify", "Read & execute", "List folder contents" and "Write" are all set to "Allow".
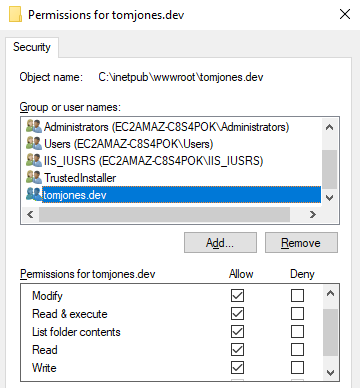
Press OK, then Advanced. Under the Permissions tab, select the application pool user, check "Replace all child object permission entries...", click "Apply" then "OK" to confirm.
Website configuration
Back in IIS, right click "Sites" and "Add Website" with the following values:
| Property | Value | Description |
|---|---|---|
| Site name | your domain | e.g. tomjones.dev |
| Application pool | the pool you just renamed | |
| Physical path | your website files directory | e.g. C:/inetpub/wwwroot/tomjones.dev |
| Host name | your domain | e.g. tomjones.dev |
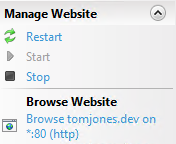
Start the website if it isn't already, and navigate to your website in the browser.
If everything is working as expected, you should be presented with the Umbraco installation screen (or your website's home page). If not, check the Troubleshooting section at the end of this guide.
Install Umbraco
This step is relatively straight forward, simply fill in the details you're prompted for, several of which are self-explanatory, and hit install:
| Property | Value | Description |
|---|---|---|
| Name/Email/Password | The admin user's name, email address and a strong password | |
| Database > Database type | SQL Server Express | |
| Database > Server | EC2AMAZ-<machine name> | This can be found by opening SSMS, the server/machine name is shown as the username. Alternatively, EC2 instances usually show this as the "Hostname" value on the desktop's background |
| Database > Database name/Login/Password | The details you used during the Configure the database step |
Troubleshooting
- Check Event Viewer application logs
- Check C:/inetpub/wwwroot/<website name>/umbraco/Logs (directory doesn't exist until after installation)
- Check IIS web server logs for status codes
HTTP 403
Ensure the contents of the correct directory were copied over (bin\Release\net6.0\publish).
HTTP 500.x
- Add a "media" folder to the wwwroot directory if this fails to create during Umbraco installation
- "ModelsBuilder" appsetting should be set to "Nothing" in production
- Database connectivity issues
- the database should exist before Umbraco installation
- user name or password incorrect
- database user needs create, read and write permissions
HTTP 503
- IIS AppPool file permissions missing read/write or modify permissions to the website's file directory
- SQL Server authentication hasn't been enabled
Miscellaneous
NuCache file lock: recycle the IIS AppPool
Unable to select database type during Umbraco installation: remove any "ConnectionString" blocks from appsettings.json and restart the website.
Umbraco page not found: ensure Razor compilation is set to false
<RazorCompileOnBuild>false</RazorCompileOnBuild>
<RazorCompileOnPublish>false</RazorCompileOnPublish>
Umbraco “Boot failed” screen shown: go to IIS and stop the website, recycle the app pool, then restart the website.
Optional next steps
Link a Route53 domain name to your IIS website (ARTICLE NOT YET PUBLISHED)
Secure your Windows hosted website with free a SSL certificate (ARTICLE NOT YET PUBLISHED)